by Keith | Jul 17, 2023 | Projects
Welcome to the exciting world of woodworking, where a blend of creativity and practical skills come together to create functional and beautiful pieces. Whether you’re an experienced woodworker or just starting out, having the right tools in your workshop can make all the difference in achieving successful results.
In this blog post, we’ll explore various hand and power tools used in a woodworking shop, along with essential stationary tools and specialized equipment to take your craftsmanship to new heights.
Hand And Power Tools For Woodworking
Chisels are essential hand tools used to carve and shape wood, while hand planes help smooth out rough surfaces.
Chisels
Chisels are a fundamental woodworking hand tool that every woodworker should have in their shop. These versatile tools consist of a sharp, beveled edge attached to a wooden or plastic handle and are used for tasks such as carving, shaping, and cutting various types of wood.
There is an array of chisel types available on the market, each designed for specific woodworking tasks. For example, bench chisels are perfect for general-purpose work while dovetail chisels offer precise control when creating delicate joints in cabinetry or furniture-making projects.
Mortise chisels help create intricate mortise-and-tenon joints commonly found in traditional timber frame structures.
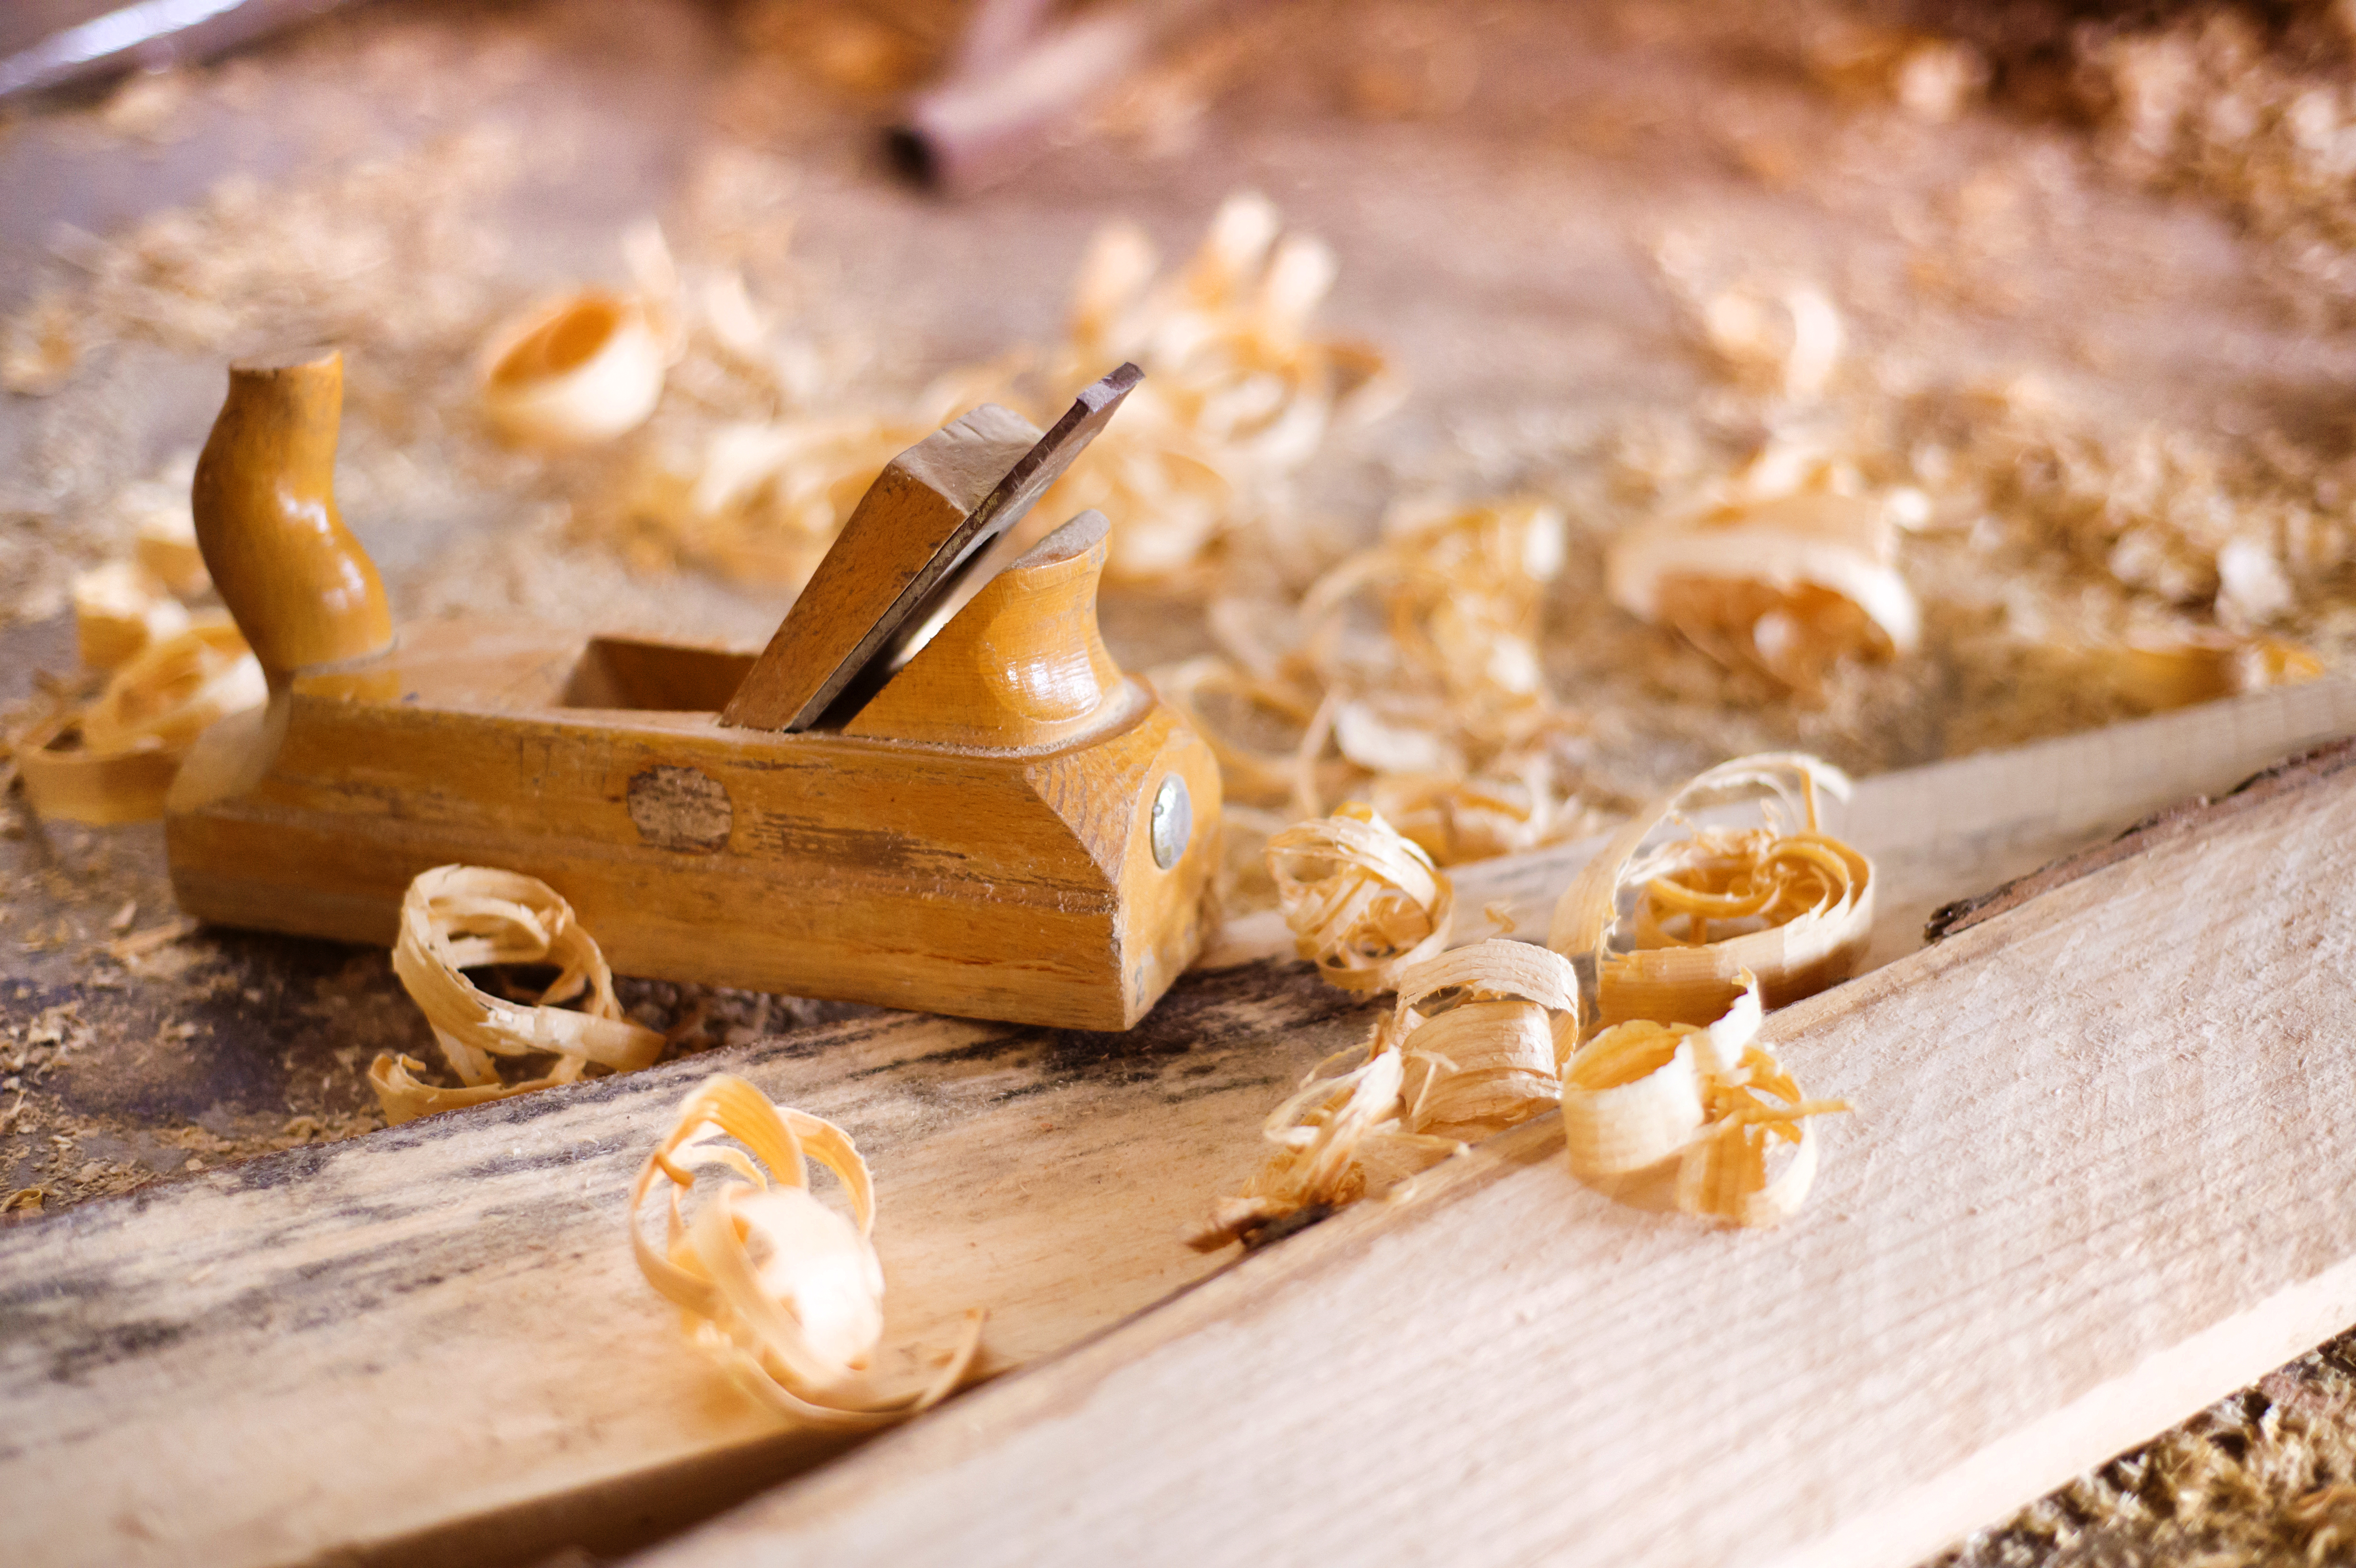
Hand Planes
Hand planes are essential woodworking tools that have been in use for centuries. They are used to smooth, shape, and level surfaces of wood by removing thin shavings.
A hand plane consists of a blade or iron which is fixed at an angle to a wooden base known as the body, and a knob or handle at the front to control it.
A popular type of hand plane is the smoothing plane which is used to create a highly polished finish on wood surfaces. Smoothing planes typically have blades with shallow angles and narrow throats for precision cutting.
They can also be used on curved or angled surfaces by tilting the blade slightly during use. Other common types of hand planes include jack planes and shoulder planes, both useful for rough shaping and trimming edges respectively.
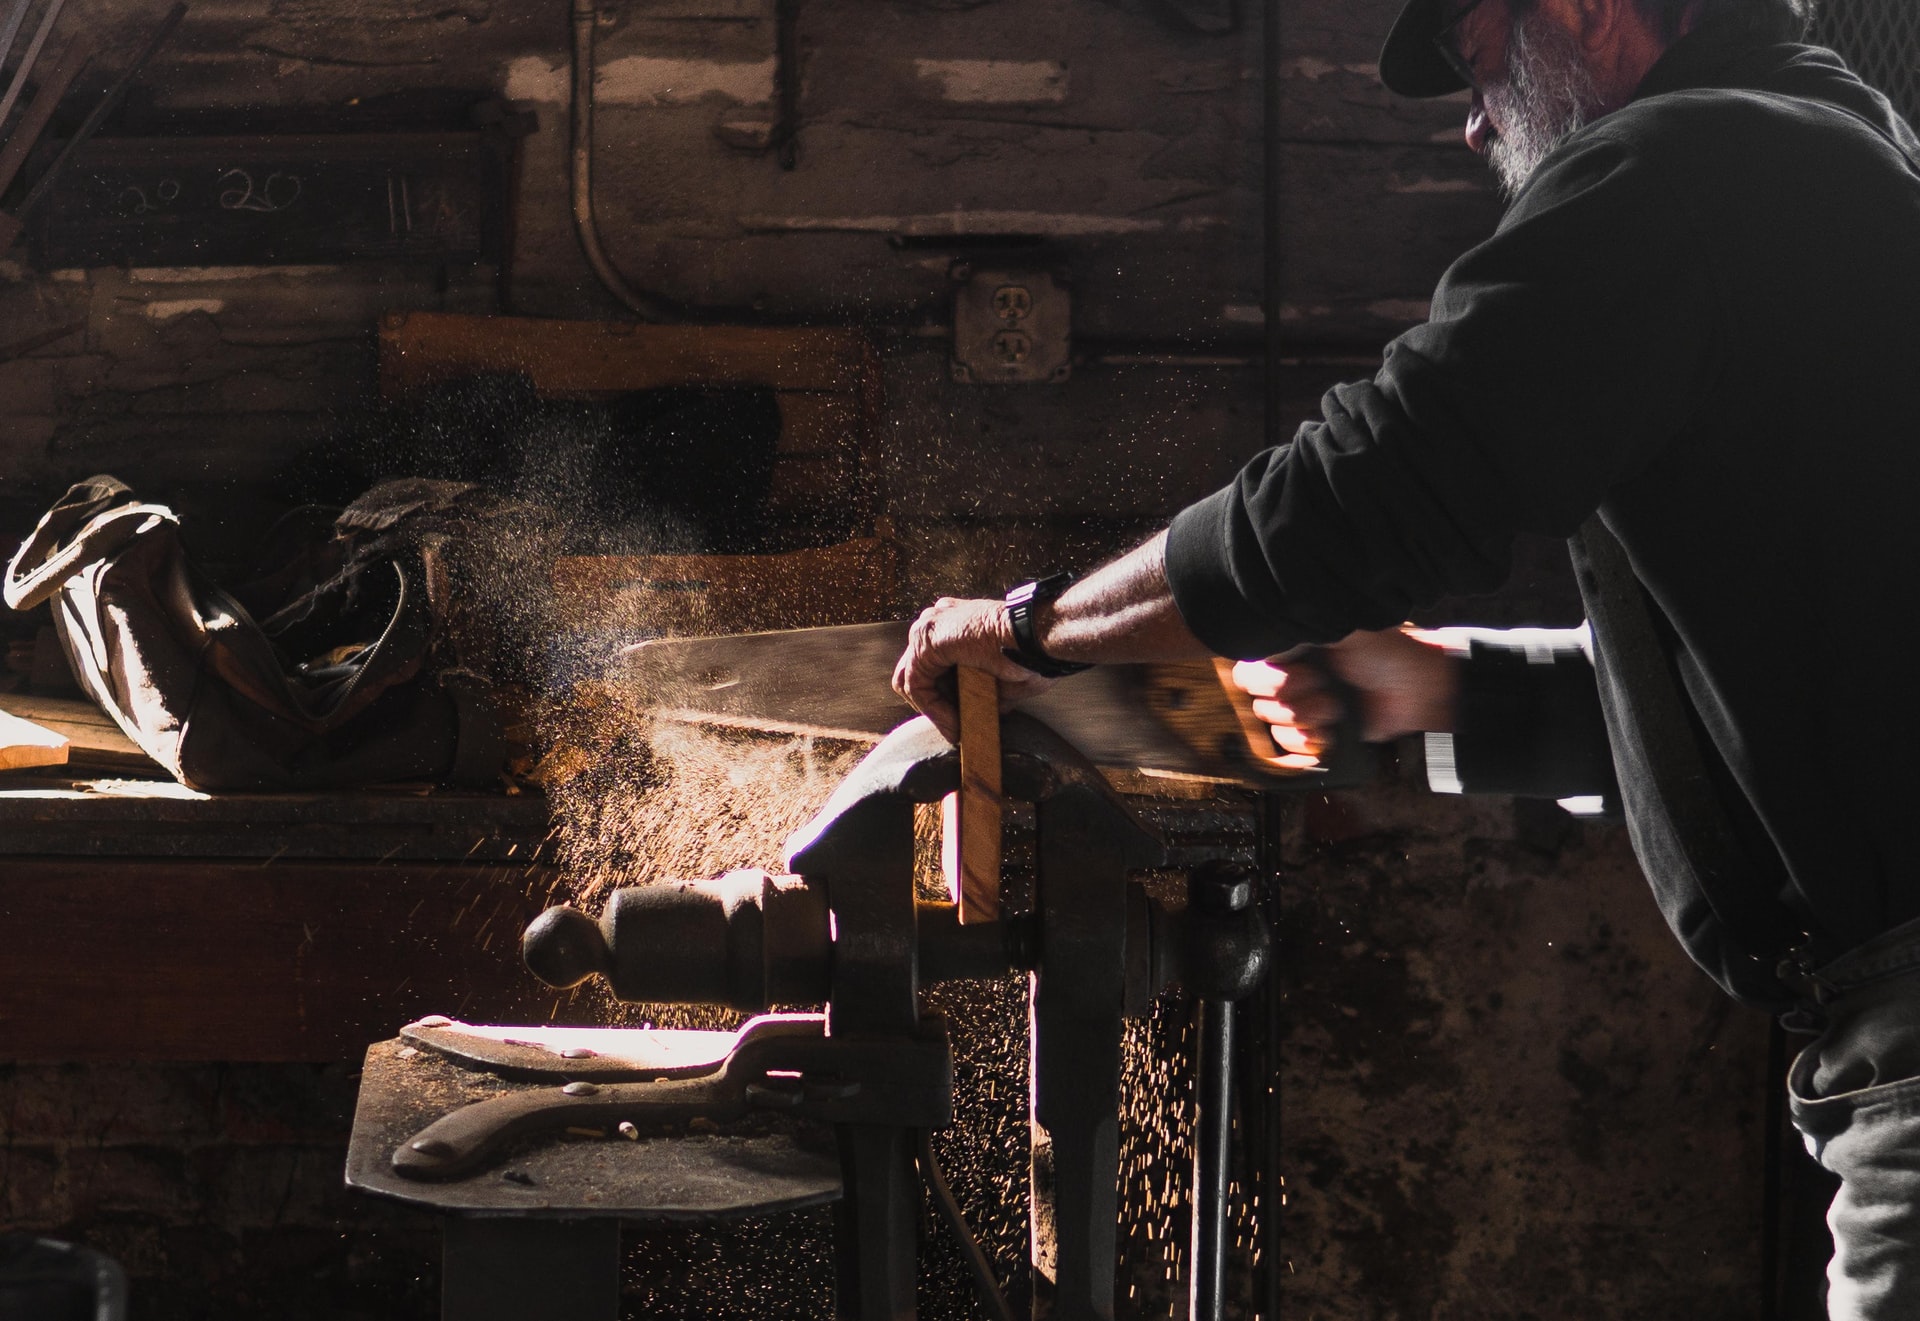
Handsaws
Handsaws are essential in a woodworking shop and come in various styles for different cutting tasks. The most common handsaw is the crosscut saw, used for cutting across the grain of wood.
Additionally, rip saws cut with the grain while panel saws are ideal for precision cuts on thin materials. A coping saw is perfect for intricate work and curved cuts while a dovetail saw is great for joinery.
Investing in quality handsaws can make all the difference with time efficiency and accuracy when working on projects that require hand-cutting techniques.

Clamps
Clamps are a crucial part of any woodworking shop. They hold pieces in place during the cutting, sanding, and joining processes. There are various types of clamps available for different tasks, including bar clamps, pipe clamps, F-style clamps and quick-grip clamps.
Bar clamps are versatile and can be adjusted to fit the size of the workpiece. Pipe clamps operate on the same principle but use pipes as their bars instead; they can cover a more extensive range than bar clams but aren’t adjustable.
F-style Clam uses two jaws connected by a bar with an adjustable screw that can exert high pressure across joints parallel faces; they’re perfect for cabinetmaking and frame assembly.
Quick-grip or one-handed-clams is best for DIYers as it allows single-handed operation when holding smaller projects together temporarily, while other accessories clamp securely onto them when working with larger parts.
Table Saw
The table saw is one of the most essential and versatile tools in any woodworking shop. This powerful machine consists of a circular blade mounted on an electric motor that rotates at high speeds to cut through wood with precision and speed.
Table saws come in various sizes and configurations, from small benchtop models to large cabinet-style saws that can handle even the biggest projects.
To use a table saw effectively, it’s important to have the proper accessories such as a miter gauge, fence, push stick, and blade guard. Safety is also crucial when working with this tool since it involves spinning blades that can cause serious injuries if not handled correctly.
Router
A router is a powerful woodworking tool that can perform a wide variety of tasks. It is used to hollow out or profile an area in wood and make decorative cuts and shapes.
A good router should have variable speed settings, allowing you to control the RPMs for different types of cuts. It’s important to use the correct bit with your router, depending on the task at hand.
For example, if you’re edging a piece of wood, you would want to use an edge-forming bit. On the other hand, if you’re cutting a groove into your wood project, you’ll need a straight or spiral bit.
Drill Press
A drill press is one of the most versatile tools in a woodworking shop. It’s a stationary tool that can drill holes with greater accuracy and precision than handheld drills.
Drill presses are available in several sizes, but the most common ones have a spindle range of 500 to 3000 RPMs with adjustable speed settings. The advantage of having a drill press is that it can create perfectly straight and angled holes when using an angled drilling table attached.
When using a drill press, safety should be given top priority because they have sharp rotating bits that could cause severe injuries if not handled correctly.
Jointer
A jointer is a woodworking tool used to create perfectly flat and straight edges on wood boards. It’s an essential tool for creating smooth, flush joints between two pieces of wood.
The jointer works by using rotating knives to shave off thin layers of wood from the board’s surface until it becomes perfectly flat. This machine is particularly useful when working with rough sawn lumber or twisted boards that are difficult to work with otherwise.
Investing in a high-quality jointer can make all the difference for your woodworking projects, ensuring that you achieve precise cuts and perfect seams every time.
Measuring And Layout Tools
Measuring and layout tools are crucial for precise woodworking. These include tape measures, rulers, squares, levels, and angle finders. Tape measures are essential for measuring longer distances while rulers are best suited for shorter measurements.
Squares come in various sizes and shapes to ensure that your angles remain accurate throughout the project.
One popular tool is a digital caliper – this allows you to accurately measure the thickness of wood or the diameter of dowels or screws quickly and efficiently. A flat surface like a workbench is also necessary when taking these measurements as it provides stability when using measuring equipment such as a spirit level or straight-edge ruler.

Essential Stationary Tools For Woodworking
The essential stationary tools for woodworking include a planer, lathe, belt sander, and disc sander.
Planer
A planer is an essential stationary tool for woodworking that flattens and smooths wooden boards. It’s a must-have if you want to ensure your project comes out with clean, straight edges.
The machine comprises two parallel blades that rotate in opposite directions, cutting away thin slices of wood from the surface of the board. A planer can also be used to adjust thickness, making it perfect for creating uniform boards or leveling joints.
Although some carpentry purists consider hand planes superior to power planers for certain tasks, most modern woodworkers prefer using power tools like electric handheld planers or benchtop models for convenience and speed.
There are several types of Planers on the market today – portable thickness planers, stationary thickness planers, and jointer-planer combination machines which incorporate a jointing feature into their design, making them more versatile than single-purpose machines altogether – all these make Planers one of the most important tools found in any woodworking shop arsenal alongside other key equipment such as Table saws, drills presses and sanding accessories.
Lathe
The lathe is an essential stationary tool for any serious woodworking shop. It allows you to shape and turn wood into various forms, from intricate spindles to decorative bowls.
A lathe consists of a bed, headstock, tailstock, and tool rest that work together to create precise cuts on the wood. There are different types of lathes that vary in size and capabilities, from small benchtop models suitable for hobbyists to large industrial-sized machines used by professionals.
Belt Sander
A belt sander is a must-have tool in any woodworking shop. It’s versatile and can be used for various tasks such as smoothing rough surfaces, shaping curves, and removing old finishes.
One advantage of using a belt sander is that it allows you to remove material from your workpiece much more quickly than with traditional hand tools. Plus, you can switch out belts of different grits depending on what stage of the project you’re in – coarse grits for heavy stock removal and finer grits for finishing touches.
Disc Sander
A disc sander is a stationary tool used for sanding and smoothing large, flat surfaces. It consists of a circular sanding disc that rotates on a motorized spindle and can be adjusted to various angles for versatility in use.
When using a disc sander, it’s important to wear protective gear like safety glasses and earplugs as the machine can produce significant noise and debris. The operator should also avoid overloading the sander with too much pressure or material at once as this can cause damage to both the sandpaper and the machine itself.
Specialized Woodworking Tools
Specialized woodworking tools like the band saw, scroll saw, mortiser, and miter saw are critical for precision cutting and joinery.
Band Saw
When it comes to specialized woodworking tools, a band saw is an essential piece of equipment that can make intricate cuts and shapes with ease. This stationary power tool uses a continuous looped blade mounted on two wheels to create smooth, accurate cuts in wood.
A popular use of the band saw is resawing – cutting thicker pieces of wood into thinner slices – which allows woodworkers to create book-matching veneers or achieve consistent thicknesses for specific projects.
The versatile nature of the band saw also means that it can handle a variety of materials like metal or plastic with different types of blades available.
Scroll Saw
A scroll saw is a specialized tool used in woodworking that allows for intricate and detailed cuts to be made in a variety of materials.
It consists of a thin blade that moves up and down rapidly, allowing the user to create precise designs with ease. Scrolls saws are often used by hobbyists who enjoy creating decorative pieces such as puzzles or ornate picture frames.
One unique feature of scroll saws is their ability to make inside cuts, meaning that the blade can cut out shapes from within a larger piece of material without having to enter through an edge.
This creates endless possibilities for creative designs and allows woodworkers greater flexibility when it comes to their projects.
Mortiser
A mortiser is a specialized tool used in woodworking to create rectangular, square or round holes known as mortises. This tool is particularly useful when creating joints between two pieces of wood that require a tight fit.
Mortises are often required for the creation of furniture and can be made using various types of machines, including benchtop models or floor-standing versions.
One popular type of mortising machine is the hollow chisel mortiser which uses a drill bit with an attached chisel to remove material from within the hole being created. Other variations include horizontal and vertical slot mortises which use rotating cutter heads to cut out the desired shape.
Miter Saw
A miter saw is an essential tool in any woodworking shop. It’s perfect for making angled cuts on wood, which is crucial when you’re working on projects that require precision and accuracy.
The blade of a miter saw is mounted on a pivoting arm, allowing you to adjust it to the desired angle or bevel before making your cut.
One of the main advantages of using a miter saw is its ease of use and versatility. Whether you’re cutting trim work, molding, or framing lumber for a project, this tool makes quick and accurate work of it all.
Some models come with additional features such as laser guides or digital displays, making them even more user-friendly.

Safety Gear And Precautions In A Woodworking Shop
To ensure safety in a woodworking shop, it is essential to wear protective gear such as eye and ear protection, dust mask, apron, gloves, and safety glasses while working with equipment.
Additionally, fire safety should not be overlooked; proper ventilation and lighting should be in place to prevent accidents.
Eye And Ear Protection
Eye and ear protection are two crucial safety precautions that no woodworker should overlook. When working with power tools or machinery, flying debris can easily cause eye injuries if proper protective eyewear is not worn.
Similarly, loud noises from woodworking equipment can cause hearing loss over time if ear protection is neglected. Earplugs or earmuffs can be used to reduce exposure to high noise levels when operating loud machinery.
Dust Mask
Woodworking produces a lot of dust, which can be harmful to your lungs if inhaled. That’s why it’s important to wear a dust mask while working with wood.
A good-quality dust mask should have a rating from the National Institute for Occupational Safety and Health (NIOSH). Dust masks come in various types, including paper masks and respirators.
If you’re working with particularly toxic substances or producing large amounts of sawdust, consider investing in a respirator that can filter out finer particles.
Apron
An apron is a must-have safety gear in any woodworking shop. It protects your clothes and skin from sawdust, flying debris, and spilled chemicals while keeping you comfortable during long hours of work.
A good woodworking apron should cover the front of your body and wrap around your sides for maximum protection. Some aprons come with adjustable neck straps and waist belts to ensure a snug fit, while others have multiple pockets for storing tools or holding screws and nails.
They are available in different materials such as leather, canvas or denim depending on the amount of wear and tear they will endure.
Gloves
Gloves are an essential safety gear item in any woodworking shop. They provide protection for your hands from cuts, splinters, and sharp tools. However, it’s important to choose the right type of gloves for the job.
For example, when handling rough lumber or using a table saw, sturdy work gloves can help prevent splinters and minor injuries. On the other hand, when working with delicate finishing materials like varnish or stains, latex gloves or nitrile exam gloves may be more appropriate to avoid contamination and preserve a smooth surface finish.
Safety Glasses
Safety glasses are an essential piece of safety gear in any woodworking shop. They protect your eyes from flying wood chips, sawdust, and other debris that may cause eye injuries.
Safety glasses come in a variety of styles and can be fitted with prescription lenses for those who wear glasses daily.
It’s important to note that not all safety glasses are created equal; some have higher impact resistance than others, so you should choose the appropriate ones for your type of work.
Additionally, it’s crucial to ensure a proper fit to avoid gaps where debris can enter.
Hearing Protection
The noise level in a woodworking shop can be deafeningly loud, especially when working with power tools like table saws and routers. Constant exposure to loud noise can damage your hearing over time, so it’s crucial to protect your ears while you work.
Hearing protection comes in different forms, including earplugs and earmuffs. Foam earplugs are cheap and effective at blocking out sound waves, but they can be uncomfortable after prolonged use.
These days, some earmuffs come equipped with Bluetooth connectivity that allows you to listen to music or take phone calls without taking off the earmuffs. However, keep in mind that safety should always come first; if your job requires concentration or poses danger to yourself or others around you – like operating machinery – then avoid using them for this purpose as it might lead to an unsafe environment.
Fire Safety
Fire safety is an essential aspect to consider in any woodworking shop. Wood dust and shavings can easily ignite if they come into contact with hot tools or sparks. First and foremost, it is important to have fire extinguishers strategically placed throughout the workshop in case of a fire emergency.
In addition, it’s crucial to ensure that all electrical wiring and outlets are up to code and not overloaded. Keeping the work area clean by regularly sweeping up wood debris can also help prevent fires.
Investing in high-quality smoke detectors and having them installed in different areas of the shop can provide an added layer of protection against potential fires.
Finally, make sure that flammable liquids such as paint thinners or solvents are stored away from heat sources and used only when necessary with proper precautionary measures taken beforehand.
Proper Ventilation And Lighting
Proper ventilation and lighting are crucial aspects of any woodworking shop. Adequate ventilation helps to minimize the risks associated with inhaling dust, fumes, and other harmful substances that may be released during the woodworking process.
This can be achieved through a combination of exhaust fans, air filtration systems, and regular cleaning. Good lighting is also essential for both safety and productivity in your workshop.
In addition to helping you stay safe while working with power tools, proper ventilation and lighting can also improve the quality of your finished projects.
Without good airflow, sawdust and other debris can settle onto surfaces causing blemishes on unfinished wood or paint jobs. Insufficient light can lead to missed cuts or mishaps when using blades or hand tools.
Emergency Preparedness
It’s important to always be prepared for emergencies in a woodworking shop. This includes having a hand first aid kit with bandages, antiseptic wipes, gauze, and adhesive tape.
A fire extinguisher should also be easily accessible in case of any fires that may occur from sparks or electrical malfunctions. It’s also smart to have an emergency plan in place with clear exit routes and designated meeting places outside the workshop.
Regular safety drills can help ensure everyone knows what to do in case of an emergency. In addition, it’s a good idea to keep a phone readily available in case of severe accidents or incidents requiring immediate medical attention.
So Much Information!
Woodworking is an art that requires dedication and the right tools to create beautiful pieces. This blog has discussed the various hand and power tools used in a woodworking shop.
From chisels to table saws, each tool has its own purpose in creating stunning designs.
However, safety should always be a top priority when working with any of these tools.
Remember that proper ventilation and lighting also play a crucial role in keeping you safe from accidents or injuries at all times.

by Keith | Feb 9, 2021 | Feature
Wood furniture design is an ideal job to do either as your main source of income or as a part-time activity. Additionally, it is fulfilling to design and make something with your hands and like in any other field, trying out wood furniture design for the first time is tricky. Mainly because you do not know how to start the journey towards becoming one of the best furniture designers. However, before you lose hope of ever starting the business, remember that even the best furniture designers you know started somewhere.
The baby steps that you make in the wood design journey will help you avoid mistakes that could make your dreams of becoming an amazing furniture designer fail to come true. Here is comprehensive guide on how to start your wood furniture design journey and eventually make the furniture you feel proud of.
Know The Different Types of Wood
Wood is the backbone of any furniture design. Different types of wood are used for different projects. For this reason, the first thing you should do as a beginner in the wood furniture design field is to learn the different types of wood. Learn how different types of wood behave and why they are ideal for a specific project.
It is also important that you know how the different types of wood behave when under certain conditions. For instance, if a certain type of wood shrinks and expands based on the temperature, it is not ideal for outdoor furniture. Starting any project without first figuring out where or not you are using the right type of wood will lead you to make expensive and time-consuming mistakes.
Find Out More About Tools
It is impossible to talk about furniture design without talking about tools. There are innumerable tools used in this field, all with different purposes. For this reason, learning more about tools is among the first things that you should do when starting your wood furniture journey. Get an expert in the field and ask them to help you familiarize yourself with as many tools as possible.
Understand the specific use of each of these tools and what projects to use them in. Additionally, before you start on any project, learn how to use the tools safely. Woodworking is an activity that could lead you to future regrets if you are not cautious. Therefore, know how to use these tools without causing any accidents and safely storing the tools to make them last longer.
Set Up a Working Space
Woodwork is not among the jobs that you can handle without a specific working space. On one hand, tools need proper storage for safety. On the other hand, furniture design messes up the working area. For this reason, if you do not have a specific working space, you are likely to cause more harm than good with your furniture design job. Therefore, set aside a working space where you can comfortably handle all your projects. Ensure that this working space is big enough, especially if you plan to work on bulky items that may occupy a large space.
In the working space, set aside a part that you will use to store your tools. Keep these tools organized to make it easier for you to get one when you need to use it. This will also make the tools last longer and reduce the chances of possible accidents.
Figure Out Your Niche and Start with A Small Project
The wood furniture design field is wide. To make you a recommendable furniture designer, specialize in one piece of furniture at a time. Trying to design many things simultaneously will make you lack even one piece of furniture that you can comfortably design on your own.
Additionally, for your first project, do not start with something too complicated. Instead, look for a project that you can comfortably handle even with little guidance from a woodwork guide or guru. You can then progress to more complicated projects and eventually become one of the best designers.
Understand The Woodworking Process
Every project has a process, and woodwork projects are of no exemption. Following this process is the safest way to help you ensure that you come up with something that will not lead you to frustrations. The first thing to do in the woodworking process is to choose the project and gather the right materials for the specific project. Measure and cut the wood based on the size of the furniture that you need.
Use the right tools to assemble the wood well to avoid failure of the furniture. Apply finishing or any other painting on the furniture to give it the look you desire. If you have a problem with any of the woodworking processes, ask an expert to help you practice more in it before you handle your project. This will help you come up with something you will love right from your first project.
Learn How to Finish the Furniture
Furniture is not yet ready until you do the finishing. Unfortunately, this is the trickiest part for most people, especially for beginners. Working so hard on furniture but failing to give it the right finishing will make every other effort you have made useless. After all, the finishing attracts anybody who sees the furniture, especially if you are making it for sale.
Therefore, learn the basics of how to sand and finish your projects. Know the right materials and tools to use for this part and how to use them well. Good finishing not only makes your wood look good but also helps it last longer.
Conclusion
It is daunting to be a newbie in the woodworking field. The process you follow now that you are new determines how successful you will be in the field in the long run. Luckily, by learning the right process and mistakes to avoid, you can make incredible wood furniture designs within a short time.
by Keith | Feb 3, 2021 | Feature
Desks vary in shapes and sizes, but finding the right desk for you can be a challenging and tiresome task. And it is because of this reason that many homeowners prefer making their desks.
When you build your office desk, you can choose the type of wood, design style, storage capacity, and if you want the wood stained or not. Besides that, you can make your desk at any cost, whereas buying a ready-made desk can be costly.
What is the best Wood for an Office Desk?
For an office desk to be perfect, it must withstand a decent amount of weight and march the color of your home or office. Quality hardwoods are the best lumbers to use when constructing an office desk since they play a significant role in producing fine furniture.
Furthermore, people across the state prize hardwoods for their grain and beauty, making them the best office desk choice. To help you determine the best wood to use when building your office desk, we have come up with a list of woods considering their workability, aesthetics, and technical performance.
Oak
Most offices in the United States have office desks built with oak. Oak is a perennial classic since it is durable and hard. Oak also has a beautiful trait, making it the best wood for your office desk. An oak such as European Oak comes with a medium to golden brown color, while the American White Oak boasts gorgeous pale cream sapwood. And since oak has an excellent finishing property, you can stain it to march any home office style.
You will appreciate how oak works perfectly while drilling nails, screws, and sawing if you are building your office desk with this wood. When it comes to cost, oak is a bit expensive. However, when you purchase oak, you will appreciate the beauty and reliability oak has to offer.
Walnut
People across the country love using this wood because of its pattern, color, and grain. The American Black Walnut comes with chocolate brown to creamy brown hues, making it perfect for a darker home with a sleek office setup.
This outstanding attractive appearance merges with excellent performance properties, giving your desk a stable trait. However, it is good to note that Walnut’s ornate appearance, rarity, grand, and demand, make its price go high compared to other species.
Cherry
Since the middle ages, people preferred to use cherry wood because of its unique appeal. If you want to improve your office look and value, consider looking at American Cherry species. It comes with a reddish-brown or light brown color that deepens over time. It also comes with a perfect machine tool and hand workability and impeccable nailing, gluing, polishing, and screwing properties.
African Hardwoods
If you want to improve your office’s appearance, consider looking at some of these unique and stylish African Hardwoods such as Sapele, Iroko, Zebrano, and Utile. They offer a plethora of exciting textures, grains, and colors, enabling you to create an office desk that is unique and outstanding.
For instance, most people consider Utile as the most satisfactory substitute for mahogany. It comes with purplish and reddish-brown hues that give it a classy look. It also boasts excellent durability traits that derive from its slow-growing nature. This species also boasts outstanding gluing properties and good machining.
Maple
If you are on a tight budget, maple is your go-to choice for an office desk. It contains a plethora of winning properties, such as durability and attractiveness. The wood has a pinkish-brown tinge and creamy white sapwood that makes it a stylish, attractive, and affordable choice. However, it would be best to take some precautions when working with maple since it can be slightly challenging to work with.
Ash Wood
It is a light-colored wood that is durable, easy to machine, and strong. It blends easily with the office outlook since the final result gives a modern and clean look.
Why Wood for My Home Office Desk
Sometimes you might ask yourself why wood is superior to other building materials such as laminate, metal, or wood. Well, wood comes with a natural aesthetic feature that makes it unique. Besides that, it performs flawlessly, it is durable, and it is beautiful.
Compelling evidence shows that natural surfaces such as wood improve our emotional state and reduce stress and blood pressure levels. This is because humans tend to have a distinctive attraction to natural surfaces, including wood.
Finishes for your Home Office Desk
Wooden desks get much better as they age since they attain lovely patinas in the grain. You should always apply a finish to your wood to protect the wood and enhance its appearance. If you want to ensure that your office desk stays at the top for the longest time possible, apply either a transparent, paint, or wood stain finish.
Oak, Walnut, and cherry are particular types of hardwoods that can help elevate your office’s appearance. Nevertheless, the best kind of wood for your office desk is one that you can afford and that with a perfect combination of durability, aesthetics, and water resistance traits.
by Keith | Feb 3, 2021 | Feature
Working with wood can be a fulfilling craft that takes a lifetime to master. By being safe in the shop, you can hone your skills and expand your knowledge for years to come. In this article, we’ll examine common safety hazards for both the home shop and the workplace, and what can be done to reduce the risks.
Attention & Attire
Inattention, inadequate training and lack of adherence to general safety guidelines can contribute to many instances of injury and damage in the woodworking shop. Workers should be rested, awake, sober, and focused on the job at hand; distractions, horseplay, fatigue and intoxication can all have disastrous results.
Wear shoes with closed toes and heels; long hair or beards, jewelry, loose clothing and headphones should all be secured. Have all tools at hand, and the workstation clear. Wear hearing protection, safety glasses, and gloves or a respirator where appropriate. Check the guards and safety features on each piece of equipment every time before starting.
When learning about and using a tool, keep in mind: How does it move? Are there places where it’s possible to snag, catch, nip or pinch? What are the guards in place to protect against? Use push sticks and push blocks for feeding short or small pieces of stock into your machinery to keep hands and clothing safely clear. Keep eyes on the task and hands away from the line of cut or point of contact.
Electricity
Unless working exclusively with manual tools, many critical parts of the woodworking shop are powered by electricity. Inspect all power cords regularly and replace any that show signs of damage.
Take care to route cords away from walkways to avoid tangles or falls, don’t overload surge protectors and be sure to use an extension cord rated for your shop environment. Always turn off and unplug any equipment being cleaned or serviced.
Machine Malfunction
Tools are safest when clean, properly maintained and used correctly. Thoroughly read any manuals accompanying your equipment, and be sure to have them serviced and parts replaced at the recommended intervals.
Bladed tools are particularly unpredictable when dull; a sharper blade is a safer one. Use a brush or stick to remove debris or dust from a bladed tool, and never attempt to clean or clear a jammed tool while it is running.
Always follow manufacturer directions for setup, use, cleanup and storage to avoid injury or damage to your tools; consider taking a class or consulting an expert for unfamiliar equipment. If safety guards are in place, do not attempt to remove or defeat them; consult the manufacturer if machine guards are malfunctioning or not present.
Noise & Vibration
Hearing is damaged by prolonged exposure to sounds over 85 decibels; comparable to the noise of a busy highway, this level is lower than the volume of the average drill press, drum sander or shop vacuum.
Always wear hearing protection when using loud tools and while working in a noisy environment; damaging levels of sound are not painful or even uncomfortable to most people in small amounts, allowing cumulative hearing loss to go unnoticed until it’s too late. Beyond being physically damaging, distracting noises in the shop can be their own source of trouble to the focused craftsperson using heavy machinery and should be avoided wherever possible.
Similarly, unnecessary vibration can result in inaccurate cuts or finishing, increased fatigue or distraction, and more frequent need for tool maintenance. Minimize vibration by ensuring that mounted tools are installed properly and table-based tools are on a flat, level surface without touching each other or the walls; consider vibration-dampening materials for surfaces that resonate or echo. Maintain proper lubrication, bolt torque and belt tension on all equipment for smoothest possible operation.
Dust & Debris
Eye protection should be worn at all times when working with wood or chemicals; opt for as much side coverage as possible to prevent injury from splashing stain, dropped buckets or unexpected splinters. Invest in goggles or a face shield for projects with noxious fumes or fine debris.
Dust can have a negative effect on air quality; sawdust is a Group A carcinogen according to the International Agency for Research on Cancer (IARC). Wear a respirator when using equipment that creates dust. Make a plan for adequate ventilation; opening doors or windows and vacuuming the work area regularly will make the air safer and more comfortable to work in. Sawdust in particular should be disposed of regularly in order to minimize the next serious risk: fire.
Fire
Fire can be one of the deadliest hazards to the woodworking shop, but prevention is possible with regular effort and attention. The most important step is to take action against spontaneous combustion: the biggest culprits are often rags, solvents and sawdust.
- First, spread rags used with solvents flat to dry away from flammable materials, or dispose of them in a covered bucket full of water.
- Secondly, control your dust: use equipment with bags to collect sawdust where possible and vacuum the area regularly during large projects. If the belt sander has a bag, empty it when it becomes half full. Never overfill bags or leave bags of sawdust in the car, garage, job site or shop.
- Finally, store solvents, stains and other chemicals in their original containers, in an area that is cleared of clutter and away from rags. Clean up spills quickly and thoroughly.
By keeping these guidelines in mind, a safe and healthy woodworking shop can be reasonably obtained and easily kept by any craftsman with a bit of regular attention.
by Keith | Feb 3, 2021 | Feature
A saw can either be a power tool or a hand tool. It is a tool used to cut wood, and it usually has a disk, a blade or a jagged cutting edge. There are various types of saws. These include mitre saw, band saw, chain saw, hacksaw, jigsaw, and table saw.
It is essential to maintain your saw as doing so increases the saw’s blade life and ensures the saw works efficiently, which increases work productivity. Discussed are tips on how one can properly care for different types of craftsman saw.
Table Saw
A table saw is also known as a bench saw. Table saws can either have a rip blade, a crosscut blade, combination blades and carbide-tipped blade. It primarily cuts human-made boards and solid wood. It is efficient, quick and safe to use. A table saw is used for ripping, crosscutting, bevel cuts, cutting grooves, and robbets, cutting joints, and kerfing.
For your safety and for a table saw to stay in good condition, you need to maintain it frequently. Listed below is how you can properly maintain your table saw to make your work easy and ensure you can make precise cuts.
- Always use warm water and a mild detergent like dish-washing liquid, to clean the plastic bits. Avoid harsh chemicals as they can damage the saw.
- When cleaning the tabletop, use a ball of fine steel wool and oil-based light lubricant as they will get rid of the gum buildup.
- For the adjustment mechanisms to operate smoothly, lubricate the pivot points and gears using a drying spray lubricant.
- Use a gum and pitch remover to clean the cutting blades.
- Clean the sawdust accumulated in the adjustment controls, saw cabinet, motor, and gears.
- Use paste wax or automotive wax to polish the front fence, tabletop, and rip fence guide.
Mitre Saw
One can make cuts from various angles when using a mitre saw. A mitre saw can be used to make cuts for picture frames, window casings, crown moulding, and door frames. It can make angled cuts, regular crosscuts, and bevel and compound angle cuts. A mitre saw is also convenient for use in DIY projects. It is easy to use, efficient and makes precise cuts.
If you are a craftsman, then a mitre saw is probably one of your favourite tools. For a mitre saw to last longer and make quality cuts, it needs regular maintenance. Luckily maintaining a mitre saw is a simple task. Listed below are tips on properly caring for your mitre saw.
- Sharpen and clean the blades as they enhance your saw’s functionality. Put on thick gloves or use a brush to clean the blades’ debris to ensure you do not hurt yourself. Always use the appropriate tools to sharpen your blades to prevent them from getting damaged.
- Inspect cracks, chipping, breakages, and crumbling on the brushes. Ensure there are no cuts or cracks on the power cord and replace any worn out parts.
- Lubricate the moving parts of your mitre saw to reduce friction and improve their functionality. Doing this will enhance the parts’ longevity.
- Clean the mitre saw fence and cutting table using a sponge. While at it, make sure you remove any dust particles that could be on the surface.
- Please get rid of the dust particles and debris by using compressed air to blow them off the surface. Use a rag to clean the miter saw to give it that new look.
Band Saw
A band saw is quite versatile. It can be used to cut curves, cut irregular shapes, and resawing lumber into thinner slabs. With the right blade, a band saw can cut materials like metal. A band saw makes smooth cuts. Band saws have a variety of options when it comes to the types of blades.
One can choose a blade depending on the task they have at hand. Hook tooth blades are best for hardwood, plastics, and harder non-ferrous metals. Skip tooth blades are best used with soft non-ferrous metals. Raker-set and wavy tooth blades are best for cutting ferrous metal.
To keep your band saw in good condition, you can employ the following listed tips.
- Unplug your band saw, then use an air compressor to blow off debris and sawdust from the band saw.
- Get rid of rust from your band saw using steel wool, which has been dipped in liquid rust remover, to rub the tabletop. Always use a clean cloth to clean carbon dust and dirt from the table. Avoid using solvents as they can potentially damage your band saw.
- Clean your blade using a liquid rust remover.
- Take the blade off and clean the parts that hold it like the band’s pitch and wheels saw.
Chainsaw
Chainsaws are used by different people like firefighters, construction workers, and homeowners. Chainsaws can be used for more than just cutting wood. A chainsaw can be used with wood for tree felling, limbing, bucking, pruning, and firebreaks. Chainsaws can also be used in cutting bricks, metal pipes, diamonds, and concrete. There are different chainsaws for different tasks. For instance, a regular chainsaw cannot be used to cut diamonds. A special chainsaw is used to cut diamonds.
Like every other kind of saw, one needs to regularly maintain their chainsaw to ensure that it stays in the right working conditions and lasts longer. Listed below are maintenance tips for your chainsaw.
- Always monitor the safety features such as the chain brake, ensure that it is still clean and that the chain catcher has no damage. If the chain catcher is damaged, make sure you immediately replace it.
- Ensure that your chainsaw’s air filter is clean and dry before using it. Make sure you replace it if it is excessively dirty or damaged.
- Have your starter serviced in case of damage, and always the recoil spring functions correctly.
- Lubricating your clutch will enhance your chainsaw’s performance and prolong its life.
- Check your anti-vibration to ensure they are not torn or getting too soft.
- Cleaning the chainsaw’s cooling fins ensures there is proper cooling and heat distribution.
- Clean the outside of the carburetor and ensure the fuel filter is clean. Clean the inside of the fuel tank to get rid of any gunky residue. Get a replacement if one is necessary.
- Always inspect all your plugs, wiring, and cables to ensure everything is well connected.
Hacksaw
Hacksaws were primarily made to cut metals. They can, however, be used to cut other materials such as wood and plastics. Different types of hacksaws use different kinds of blades, a regular, raker, or wavy blade. Hacksaws have either an adjustable or fixed frame. A hacksaw is best used to cut thin materials and is mostly used for either industry or household work purposes. Electricians and plumbers tend to use hacksaws the most to help them cut plastic conduit and plastic pipes.
Hacksaws are generally easy to use and maintain. Listed below are tips for maintaining a hacksaw.
- Before using your hacksaw, always ensure that the blade is clean. You can apply light oil to the blade to restrain the blade from overheating or getting damaged.
- Use the blade to cut appropriate materials to avoid damaging it.
- Make sure the frame is aligned correctly, and the blade is kept rigid and firm.
- When cutting materials, use slow, steady, and strong strokes and ensure that they are not directed towards you.
- Replace blades when the tooth wears off.
- Store in the right place after using.
- Use the appropriate type of blade.
Jigsaw
Jigsaws are best used to cut complex shapes and curves. They are not appropriate to use if you intend to make long, straight, and fast cuts. Jigsaws can also be used in cutting steel, drywall, and fiberglass.
They are portable power tools, making them convenient to have if one intends to get their work done fast. It is easy to change the blades on a jigsaw.
Jigsaws can also be cordless and are quite slim and lightweight, which makes them convenient to use. It is essential to care for your jigsaw correctly. You can employ the following tips to care for your jigsaw to ensure it works efficiently and stays accurate.
- If your jigsaw is electric-powered, always check the power cord condition before using it. Do not use it if the cord is frayed as it is unsafe.
- Ensure you do not drop your jigsaw as this may affect how it works should the baseplate be damaged or bent. In case you drop it by accident, ensure you replace the shoe if it is misshapen severely or flatten it if the damage is minor.
- Regularly lubricate the blade roller guide using oil to ensure it does not get jammed when operating it.
- To prevent your jigsaw from overheating while using it, ensure that its ventilation slots are free from debris and dust.
- Ensure that the handle is always dry, clean, and free of grease or oil before and after using your jigsaw.
- Use mild soap and damp cloth to get rid of any dirt on the jigsaw’s body.
- Ensure that the blade guide is free and clean from dust-build up.
- Use a brush to get rid of the grime as it can affect the jigsaw’s accuracy.
- Store your jigsaw in a safe place away from moisture.
- Replace the carbon brushes in your jigsaw as they get worn out over time.
- Recharge your battery.
Various saws require different maintenance tips. The above listed are a few types of saw and how they can be appropriately cared for. Ensure you read the manual that comes with your saw to ensure that you properly care for it to enhance its longevity and functionality.